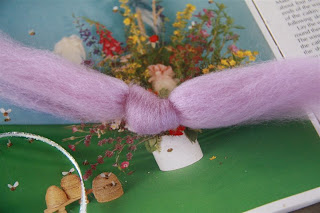
We are still in summer here so we made summer fairies, but for those of you coming into spring these little dolls will dance beautifully hung among the branches of flowers on your tables. Or perhaps you could hang one as a gaurdian angel above your child's bed.
Divide the roving in half lengthwise (half thickness) and tie a firm (not tight) knot in the center.

Fold you fleece in half over the knot, so now you have a front and back. The knot is your head; take your ribbon and tie firmly around the neck (take care not to strangle her!) with the knot at the back of her neck.
Now pull out about 2/3rds of the length of the other half of your roving and lay it across and between the two halves in your knotted long piece.
The next step is to tie the ribbon across her chest and in doing so create her waist line. Bring it down over each shoulder and across her waist then tie it gently behind her and leave the ends to trail. (cut the ends on a diagonal to prevent fraying).
She is looking good already! So next split the cross piece of fleece into two so that you have a front and back (rather than a top and bottom). I found that splitting it unevenly worked best ~ more to the back, less to the front so she has thinner arms and fuller wings.
Next we added a silk halo kinda thing but you could stop here after making a hanging thread. Thread a needle, secure it and pull the thread up from her waist out the top of her head.
To add the silk bit, thread a needle with coordinating floss and stitch small running stitch along the long edge; gather it up and stitch it to her back with small, neat stitches. Then bring the thread out through the top of her head and snip it of at a good hanging length. Fluff out her skirt a little and you are done.


7 comments:
what a great tutorial...now it looks so do-able!
xo maureen
wow! this is great! I've been wanting to make some angels for a mobile, but this is so much easier!
thanks for sharing
I've always loved making these. they are all over my xmas tree when it's up.....will definitely make more though.
Dear Shannon,
I have made these before too.
These are our summer fairies we put up each year. I made 4 different colours and then for the Feast of Guardian Angels I made them in white too.
They always look beautiful
Blessings
Gae
Beautiful summer faries, I would love to hear about the Feast of the Guardian Angels
oooh, great tutorial! Fun!
These are so pretty! Thanks so much fr sharing the tutorial.
Post a Comment